
UPDATE 2020/01/02 – Since the release of InDesign 2020, new methods have been added to InDesign’s Data Merge content placement options. However, this article will remain for posterity.
In mid February, a post on the Adobe Forums asked the question:
I’m using Data Merge to place a single image on each page. I have the frame centered on the page and its reference point set to the center. I have the Data Merge options set to “Fit frame to content”, but when I run the merge all the images align to the top left corner of the frame. The frame expands or contracts as directed, but I would like for it to expand from the center. What am I failing to do?The question was answered:
It doesn’t work for “fit frame to images” – instead the frame fitting options take the measurement from the top left.Image fitting options in Data Merge are explored in greater depth in the “Merge Right” article in issue 52 of InDesign Magazine. Ultimately, there is a checkbox in the Content Placement Options dialog box of Data Merge that is misleading – it is the “Center Content” button. This button centres the content within its frame, but not the frame to its relative position on the page. For most of the fitting methods, this is fine, but for the “fit frame to images” option, the frame size will change whenever the image size changes, and when it does, the image resizes from the top left of its position on the page, rather than from the centre point of the image.
A solution was provided to the poster along these lines:
- Create a text box larger than the largest image that is part of the merge. Align the text to be centered not only left and right, but top and bottom (from the text frame options). If done correctly, the flashing cursor should be in the center of the textbox.

- Draw a new graphic frame and assign the image field of the data merge to the frame.
- Cut and paste it into the textbox. If done correctly the box should be centered within the textbox.

- Make sure that Image Placement dropdown of the Content Placement Options from the Data Merge panel is set to “fit frame to images”

The solution is also flexible in that the image can be aligned to left, center or right horizontally, and/or top, center or bottom vertically.

The solution works… provided the text box is big enough for the images within the data merge… otherwise the item becomes overset and the image disappears.
It is also a somewhat clunky solution as it means having a large textbox in the document simply to position an image.
An alternate solution would be to draw a larger than normal frame with the “Center Content” turned on using the “preserve frame and image size”, but if the content was to have an outline on it then this solution would not be appropriate.

However, CS6 introduces a new text frame feature called auto size. This is handy for not only making text boxes fit the type only, but for creating minimum sizes and allowing the box to “grow” when more text is added, based on the auto-size instructions in the options.
Using this new feature, we can take the earlier solution and apply the auto-size to the text box that is housing the now inline graphic. I can now also control where the image “grows” from using the auto-size instructions, rather than using the text alignment features of the text box.

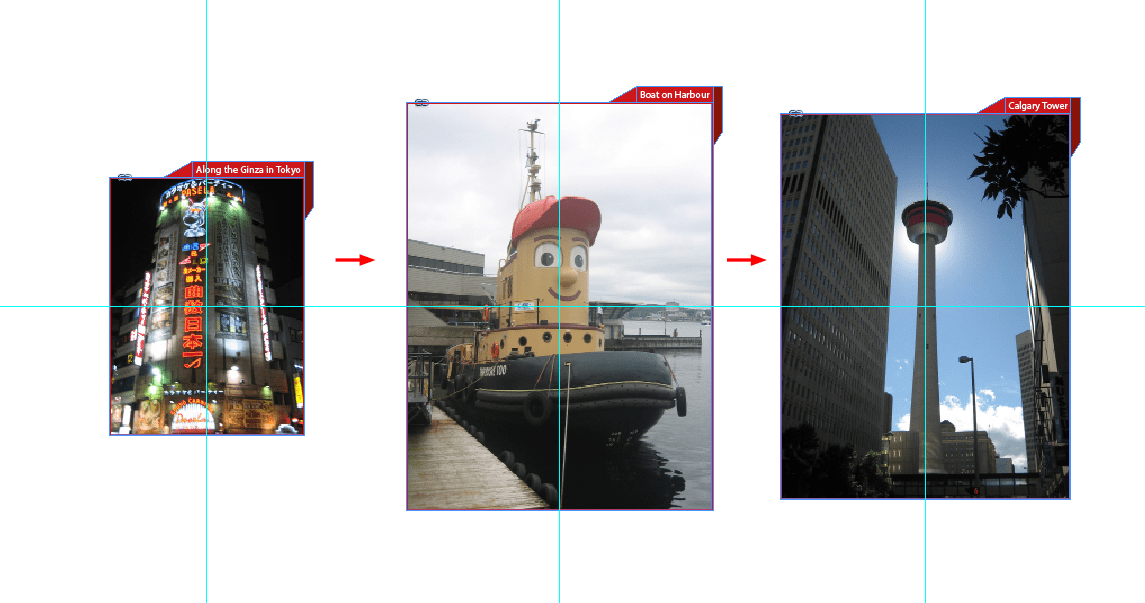
The other great feature is that I can use anchored objects with this image too… something that I could not normally do with an image frame as anchored objects can only anchor to text frames. In this case I’ve added a fancy caption bar that uses anchored objects of its own to grow/shrink the caption as the data comes in.

So scrolling from record to record, I can see that the images are indeed starting from their reference point in the auto-size dialog box, and that the caption anchored object is always staying in its position at the top right of the picture.
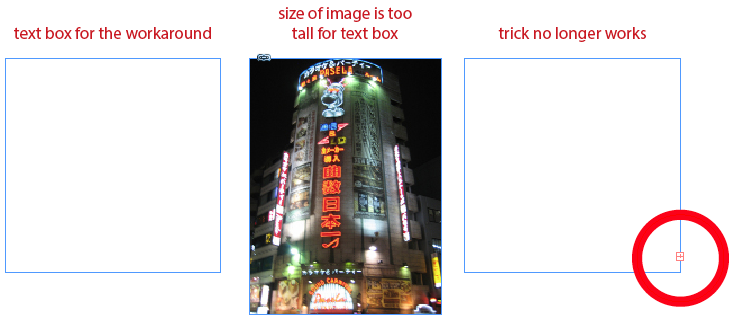
When merged to single page merges, this trick works fine… however when I merge to multiple records per page… it goes haywire.

Despite this bug, this trick is also handy even if data merge isn’t being used. As a snippet or a library item, as not only does caption stay in the same relative position to the image regardless of where the image is moved, but there is more flexibility as to how the caption can be positioned or designed.
The file used for this article can be found here. To keep the file size down, the original links have been removed so that substitute the links and merge file can be used to try this out.
Hey colmin8r, this looks awesome, I am having a similar problem with creating a 350 page flip book via data merge. I have applied your image within a text box scenario, and the frame still places from the top left corner. Any other suggestions. Or is this a CS6 only ability? I am currently aligning 350 pages 1 at a time…
Cheers. Aaorn
I need more information about what has been done. Are you able to upload the indd file (the pre-merged one) to an FTP, dropbox service (or similar) so that I can understand what outcome is to be achieved?